

We love to build web applications using the Laravel framework and deploying those applications is obviously a necessary step. Although we have some knowledge about server management, we aren’t fond of maintaining and configuring servers. Luckily, Laravel Forge and Envoyer exist to help us. With Laravel Forge, it’s easy to manage servers. A new website is online in no time, cron jobs and queues are easily set up and even a more advanced setup using a network of servers and load balancers can be configured. With Envoyer, we manage deployments. In this post, we will describe the setup and tools we use.
Laravel Forge
Laravel Forge is the tool to manage your servers. The first step is to create an account. There are several billing plans available, starting at $12 per month. Next, we have to connect a server provider. Several cloud servers are supported out-of-the-box: Amazon, Digital Ocean, Linode, Vultr and Hetzner. Additionally, you can manage a custom VPS. We prefer the cloud servers of Digital Ocean. It’s quick, cheap and has a lot of documentation on how to arrange things on your server for situations that are not managed by Forge.
Create an account at Digital Ocean (or the server provider of your own preference) and get the API tokens via the settings panel. Then go back to Forge and navigate to your Profile > Server Providers. Here, you can add the API token so that Forge is able to perform actions at the server provider. After finishing this step, you can create your first server. Go back to the Forge homepage and create a new server by filling in the form below.

After submitting the form. we’ll have to wait a while because Forge is performing several tasks in the background.
When this process is finished, we have to add our site. Switch to the tab ‘sites’ and remove the default site that has been created for you. Then it’s time to create your actual site. Fill in the domain and its aliases if you have any. This can be something like example.com, or subdomain.example.com and choose the web directory of the project. For most Laravel applications, this will be ‘public’. If you decide to manage deployments using Envoyer, you will have to update this later on.

Domain names
Domain names are not managed by Laravel Forge. You can buy a domain name somewhere online and adjust the DNS record by pointing the domain name to the IP of the newly created server.
Free SSL
When using Laravel Forge, a free ssl certificate can be added to the website using LetsEncrypt. Go to your website in Forge and click on the SSL tab. Select Let’s Encrypt and fill in your domain. Install the certificate after your domain name has been resolved, otherwise installation will fail.

SSH access
Although many things can be managed in Forge, you have to login to the server sometimes. Before you can login, you have to set up ssh keys. Go to the server you just created and switch to the tab ‘ssh keys’. Here you can add your public key. Next, logging in to the server is achieved using the following command:
ssh forge@123.456.78.90
Databases
When creating a new server with Forge, one database is created by default. Its credentials, together with some other details of your server, are sent to you by email. It’s possible to create additional databases using Forge. Just go to your server in Forge and click the database tab. Here you can create new databases, manage existing ones or create database users.
We like to access our databases using TablePlus. On the database page in Forge, you will find a ‘Database Connection URL’ to quickly setup the connection.
Deployment using Envoyer
Although Forge can be used for deployment of your code, Envoyer is more suitable for this job since it has a zero-downtime setup and the ability to deploy to multiple servers. Below we will describe how to set up deployments using Envoyer. Please note that this is a description of how we use Envoyer ourselves. The full documentation can be found here.
Differences between deployment via Forge and Envoyer
When deploying an application using Forge, Forge creates a folder on your webserver, e.g. example.com. When deploying, all code will be placed inside this folder. Also the storage folder, where user uploads are stored, is inside the example.com folder. This is a simple folder structure that may lead to downtime when something fails during deployment.
Envoyer solves this issue by using a different, zero-downtime setup. It does create a folder on your webserver for your application, e.g. example.com, but within this folder there’s an ‘envoyer’ folder. The ‘envoyer’ folder contains 3 subfolders: current, releases and storage.
The deployment process works as follows: for every deployment, a new folder is created in the releases folder. Only when deployment is successful, the ‘current’ folder will be symlinked to the latest release. With this setup, there will be no downtime when something goes wrong during deployment. Envoyer cleans up old releases, but keeps the latest 4 releases, so if needed, you can easily go back to a previous version. To make sure that user uploads remain available after deployment of a new version, they’re stored outside the releases folder. They can be reached via a symlink to this folder.
Creating a project in Envoyer
First, create an account on Envoyer and login. There is a free trial available. Via your profile page > integrations, you can link a source control system like Github or Bitbucket. Enter the access token for the service you’re using and you’re ready to create your first project.
On the Envoyer dashboard, click the ‘Add project’ button. Fill in the form and enter a project name, repository and default branch you like to deploy.
Connecting servers
The next step is to connect the server you created earlier in Forge to this Envoyer project. Go to your project and click the server tab. Here you can add one or more servers to which your code should be deployed. Fill in the form: enter a descriptive name for the server and its IP address, use port 22 and connect as forge. Select the PHP version that is used on the server and check the ‘Receives Code Deployments’ checkbox.
Now, a new field appears where you can enter the project path. This is the path to which the code should be deployed and this should be:
/home/forge/domainname.com/envoyer
Due to the zero-downtime setup of Envoyer, we have to update the root directory of the website previously set in Forge. Go back to Forge, navigate to your website and click the meta tab. In the Web directory field, change /public to /envoyer/current/public.
First deployment
Now, we’re almost ready for our first deployment. There are two more steps to take. Envoyer needs to be able to communicate with Forge. This is done via a ssh key. On the servers tab in Envoyer, you find the SSH key under the ‘key’ button. Enter this key in the SSH tab for your server in Forge.
The last step is to add the environment file. On the server tab in Envoyer, click the ‘Manage Environment’ button. You now have to enter an ‘encryption key’. This key will be used by Envoyer to encrypt the contents of your environment file, which often contains passwords and access tokens. Store it somewhere safe, for example in your password manager. After choosing a key, add your .env file.
Now you’re ready for the first deployment: click the ‘deploy’ button in the upper right corner and everything will be handled for you.
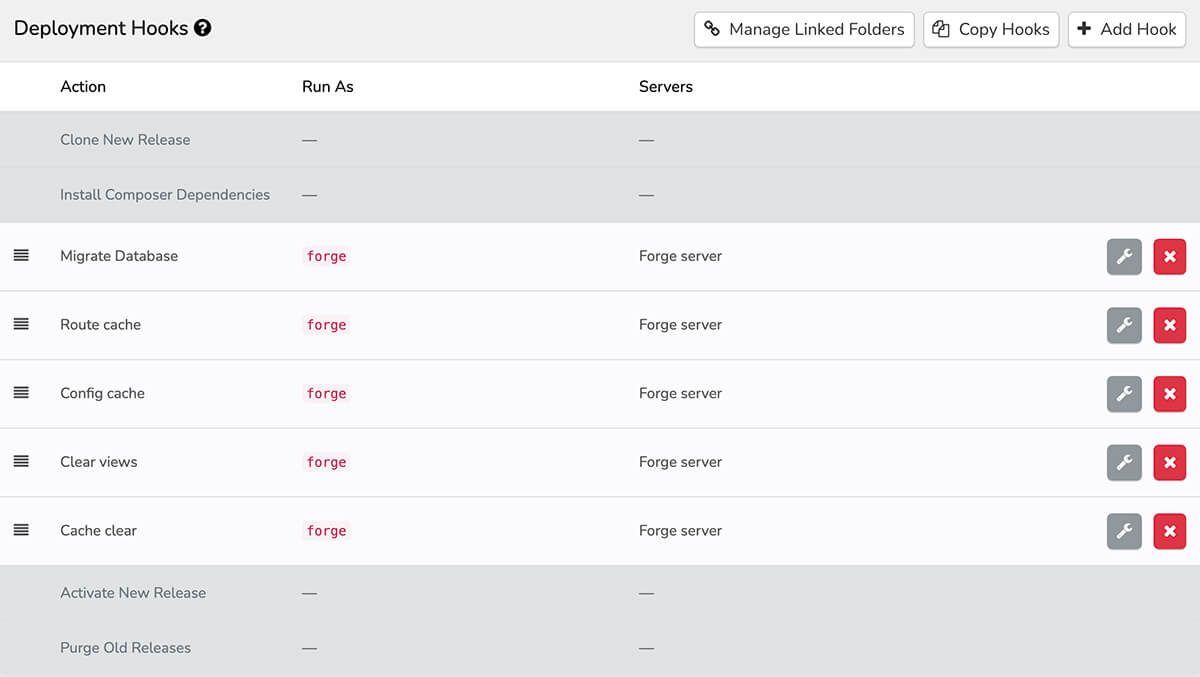
When you want to customize the deployment process, you may use the deployment hooks. Examples are running migrations or clearing the cache of your application.
A healthy application
Deployment is the primary feature of Envoyer, but it also has some features to monitor the health of your application. To make this work, you first have to set a notification channel via the corresponding tab in your Envoyer project. You can choose Slack, Microsoft Teams, Discord or Email. Just enter the webhook or email address and you’re done.
To monitor whether the website is up and running properly, go to the settings of your project and enter a ‘health check url’. Envoyer will ping this url regularly and notify you when your application cannot be reached.
If your application is using cron jobs, Envoyer’s heartbeat can be used to notify you when they stop running. On the project page in Envoyer, you’ll find the heartbeats tab. Create a new heartbeat and select the frequency of your cron job. This will create a url that can be pinged in the kernel file of your project. Envoyer will notify you if those heartbeats are not pinged at the expected time.
Summary
In this post, we described our setup for the deployment of Laravel web applications using Forge and Envoyer. As a quick reminder, a list of tools and what they are used for:
- Digital Ocean: here we rent a server
- Laravel Forge: tool to manage the server
- Domainnames: external company
- SSL: Freely available via Laravel Forge (Let’s Encrypt)
- TablePlus: tool to manage the database
- Envoyer: deployment of the application
Further reading
This post describes the setup for a very basic application. More complex configurations are possible when using Forge and Envoyer. For example, a scalable setup using multiple application servers, a queue server, database server and a load balancer can be setup with these tools.
Running and managing queues are not discussed in this post, but are easily set up with the help of Laravel Horizon. A guide on how to run the queues of multiple applications on a single server can be found here.
Additionally, if you have a Vue application, you can also use Laravel Forge for its deployment. In this post, we describe how to set this up.